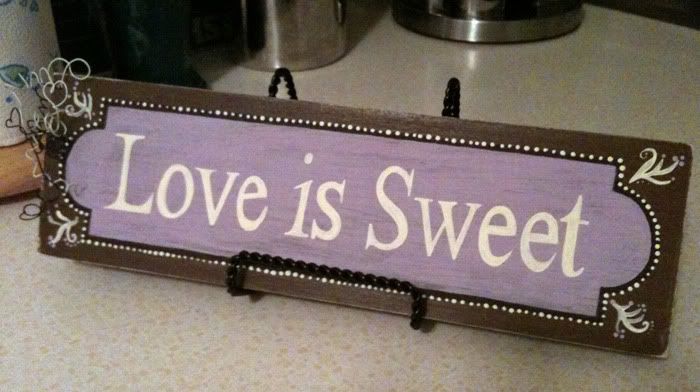
"Love is Sweet"
A close friend recently asked me to create a sign for the candy bar at her wedding reception. The wedding colors are lavender & gray, and the decor has a bit of a vintage tone; the tags that will be tied around each jar are printed in black ink on a cream cardstock, using a template from Martha Stewart weddings. So... off I went!
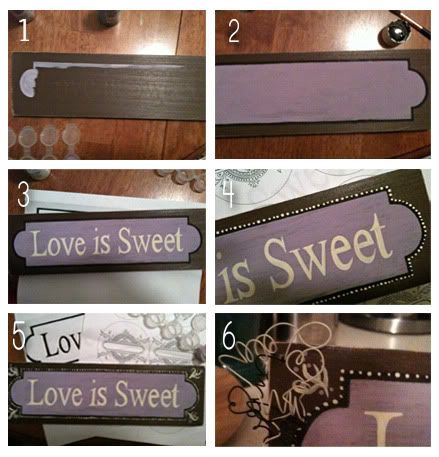
1. I started out with a 10"x3" board, painted with my favorite chocolate brown basecoat and sanded down a bit around the edges & corners. I created a larger version of the Martha Stewart template, laid it on top of the board, and etched the design in. And then... the painting began. (It's definitely a challenge to mix paint and achieve the perfect color!)
2. After painting the lavender "label shape", I added a thin black border around it for some definition. I later sanded the painted design to help blend in the sharp edges of the black border and create a slighly aged look.
3. Text came next! Painted in Ceramcoat Antique White, classic Times New Roman Font.
4. I still wasn't quite feeling the sharp, black borders - so I added small antique white dots all around the frame using the plastic rounded end of my paintbrush.
5. Small floral accents with lavender dots were added to the corners, to mimic the candy jar label template and help pull everything together.
6. What would a Stephanie sign be without whirly-gigs? I twisted cream and black wire around my paintbrush handle a bazillion times, twisted some heart shapes into the mix, drilled a hole and stuck them through and out the back of the sign, to ensure they're secure. My friend can tie ribbon into the wire, or if she doesn't like the wiring, can replace it with a small ribbon/bow that compliments the rest of her decor - I've kind of left that up to her!
¡Es completo!
Finally... it's a Tuesday full of bloghops, so click the buttons below to head over to the host sites, get the rules, play along, and meet some new bloggers!
If you're stopping by from Tuesday Tagalong, Follow me back Tuesday, or Tuesday Following,
welcome and thanks for visiting!
I love new followers, and I love following your blogs, too!


